Pages

Monday, December 24, 2012

inspiration monday


here's an easy way to add some holiday inspiration to your art journal!
take your favorite photograph.....


and trace several simple shapes onto tracing paper.


then transfer your drawings to a carving block.....


and carve some stamps!


now stamp the images in your watercolor journal.....


using your favorite stamping technique.
(i used tim holtz distress inks and sprayed a very light amount
of water with a mini mister to give a watercolor effect)


now add all your favorite doodly-touches,
along with a really special message!


i hope your Christmas holidays are merry and bright, 
dear, sweet bloggy friends....
and i'm sending you many holly-jolly-wishes for
a New Year that's filled with joyful, creative days,
and lots and lots of inspiration!!
choco-hugs, xox


{i'll be taking some time off after the holidays.....
see you towards the end of january!  :)) }

{this artwork was created in my watercolor moleskine journal using moo carve,
tracing paper, staedtler carving tools, distress inks, a mini mister, pitt pens, 4B pencil}


Thursday, December 20, 2012

sweet memories


"Our hearts grow tender with childhood memories 
and love of kindred,
and we are better throughout the year for having, in spirit,
become a child again at Christmas-time."
Laura Ingalls Wilder


{here's to re-creating favorite childhood memories....
and the sweeter, the better!  xox}


Monday, December 17, 2012

inspiration monday


have you discovered creativebug?  it's a fabulous site that hosts a variety of fabulous workshops....and when i saw this free workshop taught by kelly wilkinson,  i was instantly inspired to add my own Christmas touches and a few variations!  here's how, using some tracing paper, Christmas themed rubber stamps, a large acrylic stamp block, staz-on ink, waxed paper, and washi tape.... 


first, arrange your stamps in a shape that can be easily stamped many times
 to create one large repeated image, and then place them onto your acrylic block.


decorate a piece of square tracing paper (mine measures 9"x9")
 by stamping the images in an alternating pattern using staz-on ink,
or another permanent ink that won't smear on the tracing paper.
(you may want to place a piece of scrap paper under the edge
of your tracing paper to protect your surface.)


cut your tracing paper in four equal pieces
(my four stamped pieces measure 4.5"x4.5")


now stack your four papers on top of each other and secure them by placing 
a few pieces of low-tac tape around the edges to keep them from shifting.
cut a template from scratch paper and place on top of your
decorated papers and trace around the edges.


now carefully cut out your shape using an exacto knife.
(you can cut all four papers at the same time since the tracing paper is so thin)


cut 8 pieces of waxed paper that measure 1/2" larger than your
stamped tracing papers (my waxed papers measure 5"x5").
center one piece of stamped tracing paper between two pieces of
waxed paper,  matching the edges and corners. 
do this for all four pieces of your stamped tracing paper.


now quickly run a hot iron over the entire area of your waxed paper.
the heat will melt the wax, enabling the layers to stick together.


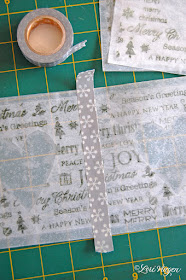
lay your squares next to each other and join them together with a piece of
washi tape.  fold the tape ends to the inside, and place another piece of tape
on the inside to cover the seam.


fold at the seam and burnish using a bone folder.


do this for all four pieces until you have a square.....
place a battery-operated candle inside and enjoy!


and here's another variation!  use crayons to draw an image onto the tracing paper.  
then place between two sheets of waxed paper, iron, and add washi tape to the 
edges.  the wax of the crayon will melt when you apply heat from the iron, giving
it a bit of a watercolor effect.  
this would be a great project for the kids!
(for safety, they can do the coloring, you can do the ironing!)


these sweet little lanterns are quick and easy to make.....
have fun creating them and coming up with even more variations!

{for more details and instructions on how to create these lanterns using dried flowers,
click here to watch the free video by kelly wilkinson over at creativebug!}


Thursday, December 13, 2012

holly jolly good


:)) 

{hope you have a holly-jolly-good weekend!!  xox}


{materials:  moleskine notebook, derwent inktense pencils,
pitt pens, 4B graphite pencil, uniball signo white gel pen}


Monday, December 10, 2012

inspiration monday


with so many things on our "to do" list at this time of the year,
it's easy to feel like we need to put our creative time on hold.....
but thankfully, inspiration says otherwise!  the trick is in finding
 quick projects that satisfy our creative calling,  and i've got a fun idea
that requires very few supplies (and very little time!).
so, gather a small carving block, your stamp carving tools, stamp pads,
and favorite art supplies, a few candy canes, and let's get started!


 first,  draw simple shapes onto small pieces of stamp carving blocks, 
and carve them out using a carving tool.  
(timesaver tip:  the simpler the shape, the quicker you can carve it out!)


then, cut or tear a piece of your favorite card stock 
(mine measures approximately 2"x3").
using a 3/8" hole punch,  make two holes at the top and bottom of your paper. 


now stamp your shape onto your paper.....


and add some doodly details using your favorite art pens.......


and see how many fun designs you can come up with!


now weave your candy cane through the punched holes....


and you've got a sweet little treat that you can use
as a gift topper, hang on your Christmas tree,
or share with your favorite elf!

these are super easy and super quick to create
and i think it's a great holiday project for the kids, too!
 (for safety, you can carve the stamp, and they can decorate! :))


{materials:  moo carve, staedtler carving tools, pencil, white card stock,
hole punch, assorted chalk stamp pads, micron pens, candy canes}


Thursday, December 6, 2012

holiday linky-links


'tis the season for little red berries on green wreaths.....


and little vintage red bird ornaments......


and tons of holly, jolly creative inspiration!


thankfully, the sweet little elves over at everything etsy have simplified the season
by offering lots and lots of lovely linkies to satisfy whatever is on your
holiday want-to-do-list this year.....

*for handmade holiday ideas, click here!
*want to create some ornaments?  click here!
*for some fabulous Christmas printables, click here!
* if you're looking for handmade gift ideas, click here!
*and to create a sweet advent calendar, click here!

{be creative, and be merry!!  :))}