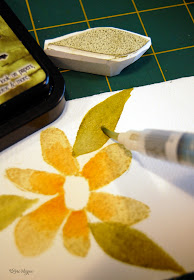
i just love how one thing always leads to another, don't you? i've been seeing a lot in blogland about "recycling" your artwork to create new artwork, and since i've been inspired lately by color drop flowers, i decided to see if i could somehow create these cuties in a different way.....and kind of put my own stamp on it.....literally! first, i traced the flower outline onto tracing paper......
and transferred the image to a piece of mastercarve, and then carved the flower out.
(you can watch my stamp carving video here!)
i stamped the image onto watercolor paper using a distress ink pad by tim holtz. then i used my waterbrush to give the petals a more uniform watercolor look (since the ink is waterbased, the water from the brush activates the pigment and enables me to use it like watercolor!).
next, i used one of my waterbased markers and my waterbrush to add a little extra color.
i carved a leaf stamp to go with the flower......
and then i added some outlining and details using my micron pens
(i'm always amazed at what a difference a little micron makes!)
add some lettering, a little graphite shading and extra color with my pan pastels....
and now i have brand new artwork using a recycled flower image to add to my journal!
goin' green was never so much fun!!


That looks so pretty, I will now desperately need some of that carving stuff! Thank you for showing! - Irma
ReplyDeleteLori this is beautiful!! Love it! Thanks for sharing your process! :)
ReplyDeleteSimply stunning. I am also amazed at what that little bit of outlining did your flower and leaves. Thank you so much for showing us the process.
ReplyDeleteoh wow! SO cool! you make this look effortless!
ReplyDeleteLori, this is soooooo lovely, thanks for the tips. Hugs
ReplyDeleteBeautiful!
ReplyDeleteSo beautiful. You just reminded me how much I really enjoy carving stamps. I need to pull out some of my supplies and have some fun!
ReplyDeleteso simple and so beautiful!! i always love watching your art process. thanks for sharing.
ReplyDeleteBeautiful!!
ReplyDeleteThanks for sharing.
I love this, it's beautiful!! <3
ReplyDeleteThis is fantastic! You have me *so* tempted to try and carve a stamp. Maybe I'll give it a try today :)
ReplyDeleteyou never cease to amaze me with your work Lori. So very pretty.
ReplyDeleteBeautiful! Just beautiful! And I agree about the Micron..what a difference a little outlining can do! I am happily starting my workshop on the color drop flowers today..YAY!
ReplyDeleteyou AMAZE me!
ReplyDeletei love how
the flower
begins
out of such
substance!
a chunk of
gorgeousness!
xoxox
beautiful, Lori! now that I have Fridays off for the summer, I'd love to come play with you one day! (yes, that was me inviting myself to your house. ;-)
ReplyDeleteI just love everything you've been creating lately. Your flower series is gorgeous.
ReplyDeleteNow THAT is one of my favorite things. You ROCK.
ReplyDeleteLori your hand carved color drop flower and leaves is brilliant. And of course now you can recreate this flower when ever you have a need to do so. I can see an entire gift wrapped in soft white tissue with your beautiful flowers all over. Happy being green...
ReplyDeleteAwesome! You made this SO MUCH MORE than just a stamped image. Beautiful work.
ReplyDeleteLOVE IT!
ReplyDeleteI WILL TRY THIS TOMORROW!
YOUR STEP BY STEP WAS SO HELPFUL FOR A NEW WATERCOLOR BEGINNER.
THANKS!
Wow, Lori! Ask and you shall receive. Thanks so much for sharing your wonderfully creative flowers. I am so inspired...
ReplyDeleteI'd still like to see a video on it from you. ;O)
you are so thoughtful - always showing your viewers the steps you take to create your art... i love that about your inspiration monday posts...
ReplyDeletethank you, thank you!
Hiya Lori! Thanks for your kind comments on my Inspired by Script Blog. Every day I check out your blog.... almost every day I am treated to some eye candy that sets me up for a day at the studio. I love your work and you are a true inspiration to more than just me I'm sure!
ReplyDeleteYour creativity is both inspirational and motivational and commenting on your blog has come far too late...I've been meaning to leave you a message or 10 for ages!
Have a wonderful creative day.
Love and blessings,
Sue x
wow a hundred times!
ReplyDeletexXx
This is just amazing - thank so you much for showing step by step instructions
ReplyDeleteHi Lori i have u on my google reader thats how i saw this and just love the spin u put on it , havent made my own stamps yet so now im iching too, im also taking the class with Martha..
ReplyDeletehugz bev
Fabulous! Love seeing how you created this lovely piece.
ReplyDeletethat 's soooo beautifull!!!!!!
ReplyDeleteSo cute idea!!
ReplyDeleteRegards from Brazil!
This is so pretty. I gotta try to do this one day. Thank you for posting!
ReplyDeleteYou are so talented; thank you for sharing your amazing gifts with us~
ReplyDeletexXx
I've just discovered this post only now (around more than two years later) but I totally fell in love with this simple technique and the beautiful outcome! Thank you :)
ReplyDeleteThis is so very cool, thanks for sharing. I am just getting into paper art,and copic pens. I usually do funky painted furniture, but I am finding the paper creations are created much faster than a piece of furniture! lol Love your work.
ReplyDelete