Showing posts with label fabric. Show all posts

Monday, March 5, 2012

inspiration monday


here's an easy way to create a fun little storage container for your studio,
using just a few supplies!


choose a mini tote bag in your favorite color and rinse it out to remove the starches and sizing.  then iron out the wrinkles.


draw a little sketch of your design using a pencil.
(you could use stencils, too!)


now all you have to do is color everything using fabric crayons 
(i've used pentel fabric pastel dye sticks......they are very creamy and easy to use!).  

{note: since i used a canvas material, i got a more textured result.  if you'd like a more solid colored image, try using a cotton muslin or other smooth fabric surface.}  


to set your image, place a piece of paper over your design and run a warm iron over it......
some of the wax from the crayon will transfer to the paper.


just to tidy things up a bit, you can add some lines, details, and lettering if you like, 
using a fabric marker.


you can also add some dots or other fun stuff using some
dimensional fabric paint!


and when you're done, you have a sweet little personalized storage container
to hold some of your favorite art supplies!
:))


{supplies:  pentel fabric fun pastel dye sticks, mini canvas bags
compact iron, black fabric pen, pencil, pitt pen, scribbles fabric paint}

p.s.  alisa burke has put together a free "finding your muse" online class!!
check it out here!  it's really fabulous!!


Wednesday, November 3, 2010

starting point


i've been going through this "thing" lately that i want to do something......i just don't know what that something is.  i don't function well when i'm in limbo.....i get impatient.  and then my impatience can lead to frustration......and i warned frustration a long time ago that it isn't allowed across the threshold of my studio door.  

so, i've decided that my limbo/impatience/hovering frustration might be my creative self's way of letting me know that maybe it's time to do a little "let go, and let grow".....maybe it's time to do something a little different.  so, today i've put away my journal, my papers, and my glue stick and i got out a piece of muslin fabric.  and you probably know me well enough to know that if i'm gonna let go, i'm gonna let-grow-happy.....and for me, happy comes in the shape of letterforms.....happy letterforms.......using a new pilot fabric pen that has japanese lettering all over it.

i'm not really sure where this piece is going yet......time to start rummaging through my growing collections of "essential supplies" and hopefully add a bit more happy to this.....


Saturday, May 1, 2010

grow strong

this is another little doodle quiltie that i created using inspiration from one of my journals. i'm always looking for projects where i can combine lots of different things that i love to do, and these doodle quilties seem to fit the mold!


this quiltie is a little smaller than the others, but still has lots of hand-stitching, beading, hand-carved stamping, and i even snuck some of my painted dryer sheets into the leaf layers....
grow strong!

you can read more about this quiltie here in my etsy shop


Thursday, April 15, 2010

fabric play

i've been itchin' to do some stitchin', so i've cleared off my work table to make room for my sewing supplies. i love working with paper, but recently my creative path has been veering towards the softer side of art......so i'm going to spend a couple of days playing and experimenting with some fabrics, threads, ribbons, maybe a few beads.....and dryer sheets....

i hope your creative path is leading you to some fun places today!


Wednesday, February 24, 2010

scrappiness

here's what you get when you combine playful mary engelbreit fabric with a fabulous tutorial from rebecca sower......a happy, colorful, scrappy flower!! rebecca's tutorial comes with well-written instructions and wonderful photographs, making it really easy to finish one of these sweet flowers lickety-split! it's a super way to use up little scraps of fabric that have been living in your stash for a while......


and when you're finished, you can pin your new scrappiness to your winter jacket to help cheer on those warm days of spring that we're all longing for!!

click here for more information about rebecca's scrappy flower!


Thursday, January 14, 2010

pure play

i have a sweet bloggy-kindred-spirit (she actually has sugar-coated-heart-shaped-wool-felt -wings adorned with beautiful beads, sequins, and other fabulous sparkly things!) who has given me some fantastic advice to help me through this creative-tough-spot that i've been in.......take out some of my favorite supplies, don't worry about doing a "finished project", and just play.


so i took her up on that little gem of wisdom, and had a ton of fun trying some things on fabric that i normally would have done on paper. i didn't use any new techniques, i just played!

here's what i used:
*the fabric is called "drill 40"....i bought it at joann fabrics (it's sold by the yard on a bolt with the muslin fabrics). it's a little heavier like canvas, but tightly woven so it's easier to write on.
*a round foam stamp
*ink pads (i used dye ink, but any would probably work)
*micron pens
*watercolor pencils (i used derwent inktense)
*watercolor brush
*pilot fine point fabric pen (sold here)


on a different note.....thank you SO much for your sweet encouragement and fun comments (you always make me smile!!) about the water challenges that we're having in our house right now. after extensive plumber-type-testing, we've been told that the problem is due to a hole in the shower pan.....which is plumber speak for "we're going to tear up the tile, replace the pan liner, re-tile, re-grout, patch up all the holes in the wall, patch up all the holes in the family room ceiling, repaint the wall damage, repaint the ceiling damage, re-stretch the carpet that's been pulled back, clean said carpet, and get lots and lots of dust and other construction-type goo all over the house".
the silver lining: it's all covered by warranty....woo hoo!
the silver lining, part 2: looks like i get to go shopping for more chocolate....woo hoo!


Monday, October 6, 2008

bright days

here is another book that i made using some of my lettering artwork on the front cover.  my original aceo artwork has been printed on canvas and then stitched to the front cover fabric...and speaking of the fabric, it's probably not the normal "autumn" color combination, but sometimes you just have to go with what you like!  the chartreuse and fuchsia are still hanging in there from the summer,  and i think that bright days are ahead for anyone keeping their thoughts in this journal!

Saturday, September 27, 2008

book dots

today i'm going to the quilt show with my friend eva, but before if go, here's a quick peek at a book that i made using multi-colored dots on black fabric.  i printed one of my ACEOs onto canvas and then machine stitched it to the front cover.  the inside covers are lined with moss green canson paper and the writing pages are torn from italian velata.  i hope i find some really great fabrics today...i'm always in the mood for adding to my collection!

Wednesday, September 24, 2008

love those batiks

here is another hardcover blank journal that i made, this time using batik fabrics for the outside covers and light green canson artpaper on the inside covers.  this book was constructed using the same techniques as my book from yesterday.  i have lots of italian velata paper, so there are 60 pages of that inside this book.  i also have lots of fabric...so consider yourself warned!

Tuesday, September 23, 2008

fabric, continued


yesterday i was playing with fabric, and made some bookcloth by fusing mulberry paper to the back of the fabric.  here is a book that i finished, using the bookcloth that i made.  inside, there are 60 pages of hand-torn italian velata paper and they are stitched to the book spine using a long-stitch variation and waxed linen thread.  for decoration, i used some gaffer tape i had (glad to finally find a use for that!) and adhered it around the spine.   this was fun to do...a little time consuming, but what isn't?!

Monday, September 22, 2008

fabric, fabric

 i've always been a "collector" of fabric.  i can drive right past the mall with no anxiety, but get me within a few miles of a quilt shop and my radar goes off.  in my world, this pile of fabric means an afternoon of fun, especially on this rainy afternoon.  so, today i spent some time making my own bookcloth by fusing mulberry paper to the back of my favorite fabrics.  i think that they'll make great books...i'll try to finish one today and share tomorrow!

Thursday, September 18, 2008

believe...part deux

as i mentioned in my post from yesterday, here is another use for the "believe" artwork that i did.  this is a blank journal that i made using italian velata paper (sorry that the photo doesn't show it, but you'll have to trust me that there's paper inside!) and fabric  and a heavyweight stabilizer for the cover.   i sewed the signatures using waxed linen thread and buttons on the outside to hold everything in place.  and...i printed my artwork onto canvas and then sewed it to the cover.  this book measures approximately 4.25" x 7" and feels very soft and organic.  (click on artwork for larger view)

Tuesday, July 29, 2008

book day at donna's


last week martha and i drove over to our favorite stamp shop, a small cleverness, and donna showed us how to make this great book. for the pages, we used gridded 3x5 index cards folded in half. we sewed each signature together using the pamphlet stitch (there are 12 signatures total) and then glued the signatures together to create our book block. the spine was finished by weaving narrow strips of calico cotton fabric through our stitches; the middle piece of fabric was kept long enough to also become the tie closure. we added a glass bead to each thread. the covers are made from black mat board, and the image on the front cover is a stamp that donna provided. this was a really fun project and took about two hours to complete. i really love the end result...thanks donna!

Saturday, July 19, 2008

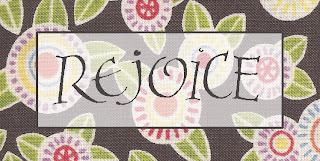
rejoice

my very artsy pal martha has created some absolutely wonderful pieces of art using photoshop. she shared some of her tips with me and i'm so happy that i was able to create this piece. the lettering comes from a piece that i did a few years ago and the background is a piece of fabric that i scanned. i had so much fun creating this...thanks, martha, for being my computer-tutor!

Wednesday, June 11, 2008

this is the day....

i did this piece several years ago and it's still one of my favorites. i used batik fabrics and then hand quilted it and finished by sewing beads onto the middle section. i applied the lettering to the fabric by scanning it and then running the fabric through my printer (very carefully!). the finished size is 9"x 6.5".  
Related Posts Plugin for WordPress, Blogger...