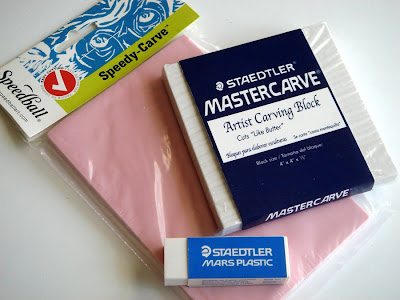
would you like to start carving your own stamps, but don't know where to start? one of the nice things about stamp carving is that there's relatively little investment, and you get a great return with a wonderful collection of hand-carved artwork! for the carving material itself, my favorite product is the artist carve block, Mastercarve, by Staedtler. it comes in different sizes and really does cut like buttah. my second favorite is a product by Speedball called Speedy-Carve...it's pink and comes in different sized sheets so that larger stamps can be carved.

once you have your carving material, you'll need a sharp blade. the most popular and accessible are the carving tools made by Speedball. the handles are usually plastic and have a removable bottom for blade storage, and the tip allows for blade changing and removal . i use the #1 v-shaped blade for detail work, and a larger u-shaped blade to remove the excess material from around the outside edges. one thing that i would like to stress is that these blades are very sharp...make sure that you keep your fingers out of the way (i speak from experience on this one!)!

Staedtler also makes a set of carving blades that are very nice. unlike the Speedball, these blades are not removable, but permanently fixed in their handles. another difference between the two is that this set is much more of an investment than the Speedball set. for me, personally, the handle seems less bulky in my hand and easier to use, and i was able to use my 40% off coupon at Hobby Lobby to help with the expense. most of these supplies can be found at many on-line sources, Hobby Lobby, and Michaels (they usually carry the blades).

once you have your carving block and your carving blades, it's time to start carving! i've been following geninne's blog for quite some time and she recently made a great video on stamp carving (view it here)...she does beautiful work and it's always fun to learn from the best! enjoy!
*this is my new "bliss" stamp! the word was originally written with a brush marker and then carved from a Staedtler block using a Staedtler blade. for the image, white ink was stamped onto black textured paper.
edited: my blog buddy lindsey, over at "piggy in the puddle" is having a giveaway for one of her fabulous hand-carved bee stamps...head on over and leave a comment before friday!

16 comments:
It looks lovely on black. I think I will leave the stamp carving to you though. I saw the little video and she makes it look so easy.
Hey, I'm going to add a link to your post here. Would you want to add one to mine? Then we can include more people in the giveaway!
Oh, it's simply BLISSFUL!!! Very good. And hey,lunch and dessert it is!!!
This is a great post and -- informative and great photos. I need some buttah--uh--some Mastercarve. It's the one supply I don't have!
Thanks for sharing your secrets! I've tried carving, but have a hard time with little details. I think I'll watch for a coupon and invest in the better tools. :-)
I love the bliss stamp. I had to share this with you but since you have no email listed in your profile, I will put it here. Go to http://danawarnerfisher.blogspot.com/ and take a look at her post of Sunday May 17th. I thought of you immediately.
oh my gosh..you won't believe what I did today! I carved a stamp! I told you I was going to try it again and I finally did! My lino was really hard...so I struggled a bit...and cut my finger of course! I should have seen this blog post first! heehee:) Now I know the good stuff to get!
thanks lori!!!
xoxo...jenn
Hi Lori. You make me want to go to Dickblick or Micheals right now. Thank you so much for the tutorial. I've always wanted to know! You're amazing.
Hi, Lori, I love the white on the black, very cool. And your brush letters are so pretty. You are the nicest person, I so appreciate your comments on my blog!
Lori! Thanks for sharing your process and the products you use! Might just try that one of these days! Miss my blogging, still getting used to the new work schedule! Hope all is well!
Lori,
Cool! I think I might try my hand at it. I'm taking up letter writing. It's something nice to send to someone and to keep in touch at the same time. Perhaps, adding a homemade stamp decal might be a nice touch :).
Thank you so much for sharing. :)
I am just starting to get into stamp carving. I have some ideas but just haven't done them yet. Seeing your stamps makes me want to get going.
You and Geninne make it look so easy! I do want to try it. Thanks for all the details Lori!
Oh, hand carved stamps are so great. I need to find some time to try my hand at this. Yours are really wonderful!
Hi Lori!
I love the tutorial, I can't wait to try one.
I've never made one before...
I listed your mosaic in my shop:)
Hugs,
Chrissie
Such a great post! Wonderful info and tutorial! I am so happy to own a handcrafted stamp made from you. It looks so much fun to make as well.
Thanks so much for coming to visit! I really appreciate your sweet comments!
Hugs,
Lisa :)
I have always wondered how one goes about creating a stamp! You're amazing! These materials will be on my personal Christmas Wish List. I can't wait to make one! Thank you!
Post a Comment